In the previous camera movement prompt guide, we covered the basic motion terms that are commonly used in cinematic AI video generation: zoom in, pullback, pan, tilt, orbit, tracking shot, and more. For beginners who have never studied filmmaking, learning these words is already a big step. Once you know the right camera language, it becomes much easier to describe the shot you have in mind.
But advanced AI video prompting is not just about putting more camera movement terms into one sentence.
A prompt like “zoom in, rotate, pan, cinematic shot” may sound professional, but it often gives the AI too much freedom. The model may move the camera in the wrong direction, focus on the wrong part of the scene, or create a motion that feels technically correct but visually weak.
The real goal of advanced camera movement prompting is to reduce uncertainty. You want the AI to understand not only what movement should happen, but also why the camera is moving, what it should focus on, and what new information the viewer should see at the end of the shot.
That is where scene context becomes important.
Why Basic Camera Movement Prompts Are Not Enough
Basic camera movement prompts are useful because they tell the AI how the virtual camera should move. For example:
The camera zooms in.
This is simple and clear, but it is also too open. Zoom in on what? The character’s face? The object in their hand? The background? The whole body? The camera may move forward, but the result may still feel random.
This becomes even more obvious when the character also performs an action. For example:
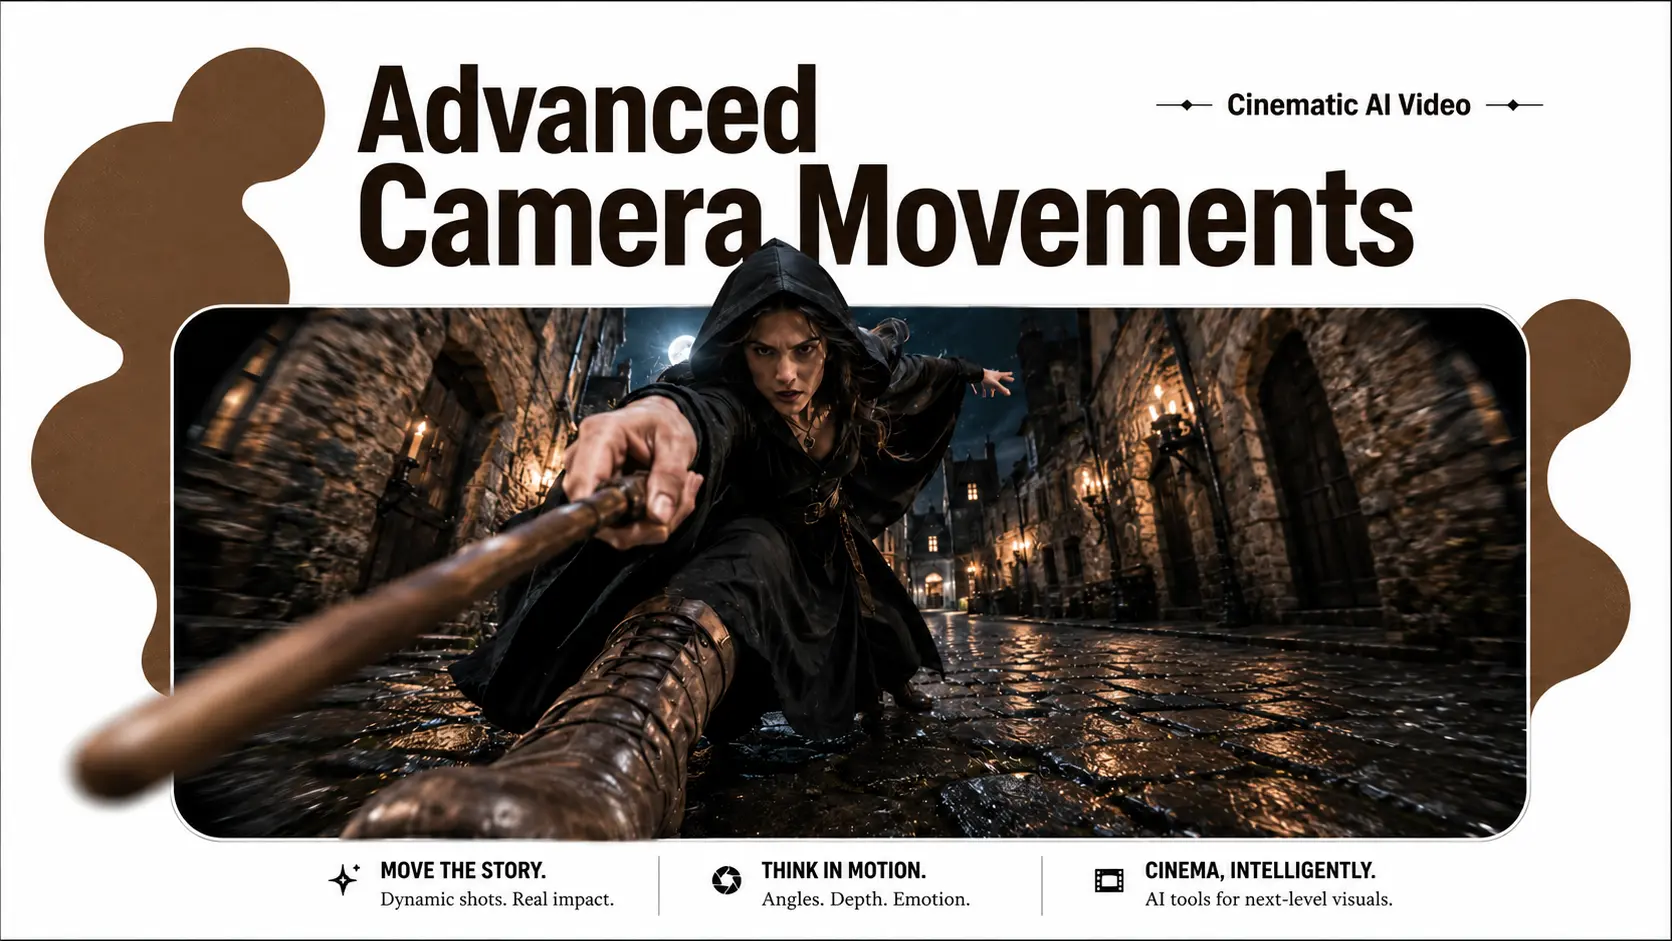
The figure turns around to the right and raises the wand in the right hand. The camera zooms in.
This prompt gives the AI two tasks: the character needs to turn around and raise the wand, while the camera needs to zoom in. However, it does not explain the visual purpose of the zoom. Different AI video models may interpret this differently. Based on the test results, Video Fast 1.5 successfully achieved the camera push-in effect, but it also introduced something we definitely wouldn’t expect to see in a medieval European alley—a Star Wars-style glowing wand. Kling 3.0, on the other hand, pushed in too little; the shot only moved from a long shot to a medium shot, leaving the character’s face barely visible. As a result, the camera move feels rather ordinary and lacks the cinematic tension and dramatic impact that a proper push-in shot should deliver.
A better advanced prompt should answer two questions:
What should the camera look at?
What should the viewer discover after the camera moves?
Add Scene Context to Anchor Camera Movement
Scene context means adding a specific visual anchor to your camera movement. It tells the AI where the movement should land.
Instead of writing only:
The camera zooms in.
I added more context to the AI video prompt, changing it to:
The figure turns around and raises the wand in her right hand. The camera zooms in on a close-up of the female character’s mouth, revealing a mysterious smile.
Reveal New Story Information After the Movement
This small change makes the camera movement much more controlled. Now the AI knows that the zoom is not just a general push forward. It has a target: the mouth. It also has a story result: a mysterious smile.
This version gives the AI more useful information. The result was that models produced a more story-driven shot. The character’s facial expression became much clearer, while also introducing new narrative information: the previously unidentifiable figure seen from behind turned out to be a witch. By focusing on her smile, the shot revealed something about her inner thoughts and intentions, while simultaneously building suspense for the next scene.
This is the difference between a random camera movement and a cinematic camera movement.
Before writing an AI video prompt, ask yourself what the most important visual detail is in the shot.
For a character scene, the focus could be:
The eyes
The mouth
The hand
The weapon
The object being held
The feet walking through water
The shadow on the wall
The reflection in a mirror
The background space behind the character
For example, these prompts all use zoom in, but they create very different shots:
The camera zooms in on the character’s eyes as they slowly realize the truth.
The camera zooms in on the glowing ring in her hand, while the background becomes slightly blurred.
The camera zooms in toward the character’s mouth, revealing a subtle and dangerous smile.
The camera zooms in on the sword tip as it reflects the enemy standing behind the camera.
The movement is similar, but the emotional result is different. This is what makes the shot feel intentional and turns it into a story beat.
Use Close-Up Camera Movement to Build Tension
Close-up movement is one of the easiest ways to make an AI video feel more cinematic. When the camera moves and focus closer to a face, hand, or object, the viewer feels that the detail matters.
However, close-up prompts need to be specific.
Weak prompt:
The camera zooms in dramatically.
Better prompt:
The camera slowly pushes in toward the character’s face until her eyes fill the frame, revealing fear and hesitation.
Even better:
The camera slowly pushes in from a medium shot to an extreme close-up of her eyes. Her pupils move slightly as she notices something off-screen. Keep the background dark and softly blurred.
The final version controls the framing, the emotion, the direction of attention, and the background behavior. This makes the AI less likely to generate a vague zoom.
When you use close-up movement, try to include one emotional detail. The detail can be a smile, a blink, a tear, a nervous glance, or a small change in facial expression. AI videos often become stronger when the motion is subtle but meaningful.
Crane Shot: Change the Viewer’s Perspective Without Cutting
A crane shot is a camera movement where the camera rises or lowers through space, often changing the viewer’s perspective. In traditional filmmaking, this is done with a crane or similar equipment. In AI video prompting, it is useful when you want the scene to expand from a character-focused shot into a wider view of the environment.
For example:
The camera slowly cranes upward from behind the character, rising above her shoulder to reveal the empty medieval alley stretching ahead.
This works better than simply writing:
The camera goes up.
A crane shot is especially useful for transition shots. It can move from a close character moment to a wider environmental reveal. It can also show more ground details, such as a battlefield, a city street, a forest path, or a hidden object near the character.
However, be careful with wording. If you write “rise extremely high” or “near-satellite view,” some AI models may push the shot too far away, making the scene look like a map or even a view from space.
If you want an overhead shot like a drone or crane view, keep the height controlled:
The camera cranes upward a few meters into a high-angle overhead view showing another young girl in dirty dress standing toward the witch, looking down at the character in the alley. Keep the character clearly visible, not too far away.
This tells the AI that you want a raised perspective, but not a satellite view. It also reminds the model to keep the subject visible.
Combine Camera Motions for Longer Cinematic Shots
Once you understand basic camera movement, you can combine two motions to create a longer and smoother shot. The key is to combine movements that naturally work together.
For example:
The camera slowly pulls back while tilting up, revealing the full height of the ancient castle behind the character.
This combines pullback and tilt up. The pullback creates space, while the tilt up reveals vertical scale.
Another example:
The camera pulls back from the character, then pans right to follow her as she walks through the crowded market.
This combines pullback and pan. The pullback introduces the environment, while the pan keeps the character connected to the shot.
You can also combine push in and orbit:
The camera slowly pushes in while making a slight orbit around the character, ending on a close three-quarter view of her face.
This creates a more stylish cinematic feeling, but it also increases generation difficulty. When combining movements, avoid stacking too many directions at once. Two camera motions are usually enough for a short AI video.
A bad prompt might be:
The camera zooms in, pulls back, rotates, pans left, tilts up, and follows the character.
This gives the AI too many instructions. The result may become unstable.
A better version:
The camera slowly pulls back, then gently pans left to follow the character walking into the fog.
This is simpler, more natural, and easier for the model to execute.
Tracking Shot: Keep the Character in Frame
A tracking shot follows a moving subject through the scene. The most important part of a tracking shot is not just that the camera moves. It is that the subject stays in frame.
A weak prompt:
The camera follows the character.
Better prompt:
The camera tracks beside the character as she walks forward, keeping her upper body centered in the frame.
Even better:
The camera tracks backward in front of the character as she walks toward the viewer, keeping her face centered and sharp while the background moves naturally behind her.
This tells the AI the camera position, the subject movement, and the framing rule.
Tracking shots are useful for walking scenes, running scenes, dance videos, fashion shots, and action scenes. But they can also fail if the source image is not suitable. Sometimes the character may drift too far away from the camera. Sometimes the body may deform. Sometimes the camera may follow the background instead of the person.
To reduce these problems, add clear framing instructions:
Keep the character centered.
Keep the face visible.
Do not let the subject move out of frame.
Maintain the same distance between the camera and the character.
Stable camera, smooth tracking motion.
These phrases help the AI understand that the subject should remain the visual anchor.
Final Tips for More Stable Cinematic AI Videos
The best AI camera movement prompts are usually not the longest prompts. They are the clearest prompts.
Do not simply add more filmmaking terms. Add better visual anchors. Tell the AI what the camera should focus on, what should stay in frame, and what new information should appear after the movement.
For short AI videos, one clear camera goal is often enough. A zoom in should reveal emotion. A pullback should reveal scale. A crane shot should reveal space. A tracking shot should keep the subject connected to the viewer. A pan should guide attention from one important detail to another.
Advanced prompting is not about making the prompt sound more professional. It is about making the camera movement easier for the AI to understand.
When you write your next AI video prompt, do not stop at “the camera zooms in.” Ask yourself: zoom in on what, and why should the viewer care?
That one extra layer of scene context can turn a simple AI-generated clip into a cinematic moment.
Last but not least, start your program with these prompts right now with AI Image to Video instead of only adding this guide to your favorites.