The VHS video effect used to be built in post, layer by layer: 4:3 framing, noise, color bleed, tape shake, and overlays stacked on until clean footage felt old. That method still works, but it is slow, technical, and often too dependent on presets.
AI changes the starting point. Instead of generating a clean cinematic clip first and forcing a retro filter on top, you can create footage that already feels analog — awkward framing, consumer-camera movement, dim interiors, nostalgic color, and slightly eerie texture — then decide whether to keep it subtly retro or push it into damaged-tape territory.
How creators made VHS video effect before AI
Before AI workflows became common, most creators got a VHS look through one of four routes.
The first was the classic editing route: Premiere Pro, After Effects, DaVinci Resolve, or Blender. You manually built the effect using color shifts, blur, grain, scanlines, shake, 4:3 framing, and overlays.
The second route was asset packs and overlays. Creators downloaded VHS noise, timestamp graphics, tape damage, static bursts, and screen grime from stock sites or template marketplaces, then composited them over otherwise normal footage. This method is fast, but it also explains why so many “VHS” videos look fake: the overlay is there, but the lighting, motion, and image softness underneath still look too modern. However, downloading from these stock sites is rarely free.
The third route was signal-based tools. A project like ntsc-rs became popular precisely because it simulates analog video artifacts at the signal level instead of just adding a cosmetic filter. It is available as open source software and as a web app, which is why it is still one of the most useful tools for creators who want something more convincing than a basic preset.
The fourth route was physical capture. Some filmmakers still exported footage, played it through old hardware, recorded it to tape, then digitized it again. That gives you real degradation, but it is slow, messy, and not scalable for people making lots of short-form content.
That is why the AI solution matters now. AI does not replace every VHS step, but it changes where the work begins. Instead of spending most of your time faking “oldness” in post, you can use AI Image to Video to create a scene that already has the right mood, composition, pacing, and era feel from frame one.
VHS Video Effect Is a Stack of Specific Artifacts
If you prompt only for “a VHS effect,” the result often looks generic. A better approach is to describe the exact VHS artifacts you want. Think of VHS not as one filter, but as a combination of image softness, tape instability, playback errors, and editorial styling. That gives AI a much clearer target — and gives you much more control over the final look.
Here are the most useful VHS sub-effects to name in your prompts:
- Analog softness / tape blur
Real VHS is softer than modern digital video. Fine detail falls apart, edges look less precise, and the image feels slightly blurred rather than clinically sharp. PremiumBeat specifically points out that convincing VHS footage needs reduced sharpness, not just added noise.
Prompt language: “soft analog blur, low-detail edges, tape softness, 4:3 home video.” - Color fringe / chroma bleed
This is the slight separation of color from the image edge, especially around bright contrast lines. It should look subtle and dirty, not like an extreme RGB glitch. Color fringing can work as one of the final touches that sells the illusion.
Prompt language: “slight chroma bleed, mild color fringing, subtle RGB offset, aged tape color separation.” - Tape wobble / displacement distortion
One of the most overlooked VHS traits is that the picture itself feels unstable. It can be described as a skewed, jelly-like distortion rather than just static on top of the image. This is great for dreamcore, liminal, or horror footage.
Prompt language: “subtle frame wobble, skewed tape distortion, unstable image displacement, horizontal drift.” - Tracking error / mistracking
Tracking error happens when the playback heads do not properly follow the recorded tape tracks, creating warped horizontal bands or unstable playback sections. This is one of the most recognizable damaged-tape looks and works especially well for horror reveals or corrupted memory sequences.
Prompt language: “brief mistracking, warped horizontal bands, unstable playback, damaged VHS tracking.” - Head-switching noise
This is the noisy band that often appears near the bottom of the frame in full-raster VHS transfers. It comes from the switching interval between video heads, so it feels more authentic than random glitch bars pasted across the screen.
Prompt language: “bottom-edge head-switching noise, noisy band at frame bottom, raw VHS transfer look.” - Video dropout
Dropout is momentary signal loss caused by tape damage, dirt, or missing magnetic material. It usually appears as white or black streaks, tiny missing lines, or brief bursts of snowy interference. This is ideal when you want a worn or replayed-too-many-times cassette look.
Prompt language: “occasional tape dropouts, white streak artifacts, brief signal loss, worn cassette defects.” - Freeze frame / tape-stop moment
VHS should not only be treated as a texture, but also as an editing behavior. A VHS freeze frame, tape pause, or glitchy stop-frame instantly pushes the video into a camcorder-memory or retro trailer direction.
Prompt language: “VHS freeze frame, tape pause, retro stop-frame, analog glitch transition.” - VHS transitions and damaged-tape bursts
A more aggressive damaged VHS package is distinguished from a normal VHS look. That can include transition hits, heavy static bursts, distortion spikes, or nearly unwatchable tape damage. This matters because a dreamy nostalgic VHS clip and a cursed-horror VHS clip should not be prompted the same way.
Prompt language: “damaged VHS burst, aggressive static hit, analog glitch transition, severe tape wear.” - Tape audio: hiss, wow, and flutter
If the sound stays perfectly clean, the VHS illusion weakens fast. AV Artifact Atlas defines wow and flutter as tape-speed irregularities that create warbled pitch changes, which pair naturally with hiss and muffled audio for analog playback.
Prompt language: “muffled tape audio, light hiss, warbled analog sound, wow and flutter.”
What kinds of AI videos work best with a VHS look
The best AI VHS videos are not random. They usually belong to a category where low fidelity actually adds meaning.
Horror is the obvious one. VHS makes horror feel less polished and therefore more believable. Analog horror especially benefits from old-media distortion, found-footage framing, and imperfect sound because the whole point is to make the viewer feel like they discovered something they were not meant to see.
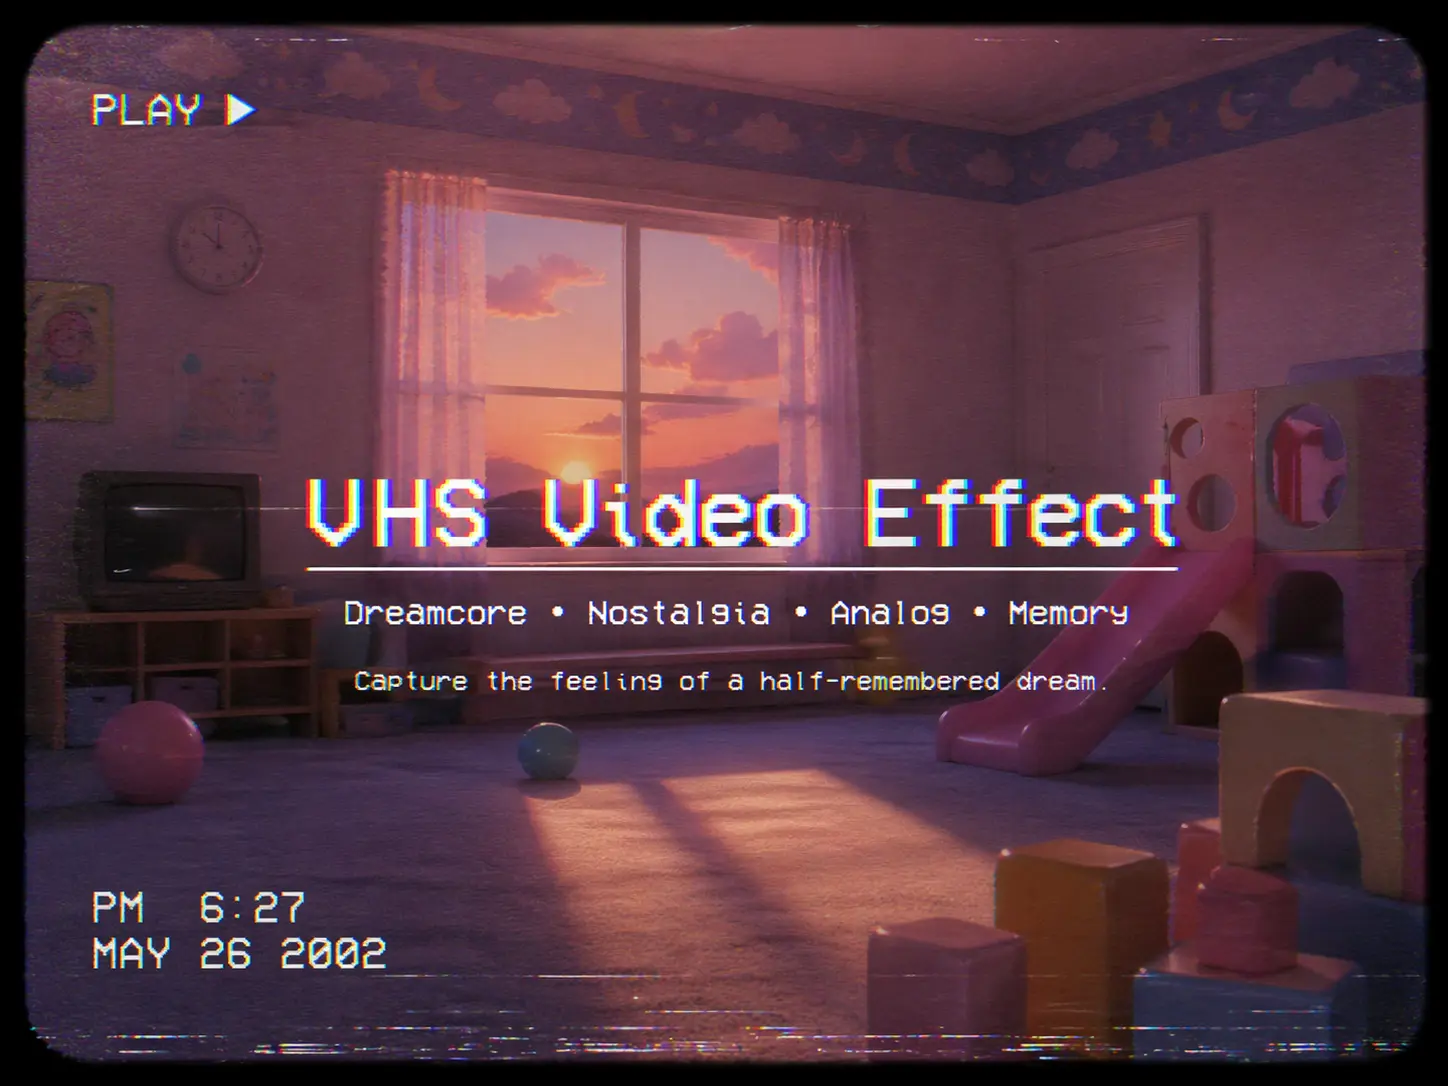
Dreamcore and liminal videos are another strong match. VHS softens edges, weakens realism, and adds memory-like uncertainty. That is exactly why it works for empty malls, silent classrooms, dusk playgrounds, old bedrooms, and uncanny corridors. The format helps ordinary spaces feel emotionally wrong in a subtle way.
Retro storytelling also works beautifully. If you are making a fake 90s diary, lost vacation footage, old romance montage, or “found family tape,” VHS instantly provides context. You do not need a big explanation because the format already tells the viewer what emotional era they are in.
Stylized music or fashion clips are the fourth strong use case. Here, VHS is less about realism and more about mood. Grain, softness, timestamp graphics, and washed colors can make a clean AI-generated sequence feel more tactile and less sterile.
How to Prompt a VHS Video Effect in AI
Do not prompt “VHS effect” by itself. Traditional VHS workflows are usually built from a few repeatable parts: 4:3 framing, color treatment, channel blur, noise/grain, and camera shake. Motion-design workflows also commonly add audio distortion, glitch, and overlay-style interference.
A practical formula is:
subject + era + camera behavior + image texture + tape/playback artifact + mood
Use more exact VHS language like this:
- 4:3 aspect ratio: home-video framing instead of modern widescreen.
- Channel blur / color bleed: RGB edges feel soft and slightly misregistered.
- Luminance noise / grain: dirty blacks, low-light crawl, rough texture.
- Video jitter / camera shake: unstable consumer-camcorder movement.
- Tracking error: horizontal tearing or unstable playback near the frame edge.
- Head switching noise: noisy distortion band near the bottom of frame.
- Loss of color lock / Y/C delay error: color shifts, smeared chroma, ugly analog misalignment.
- Skew error / tape wobble: image bends or leans during bad playback.
- Wow and flutter / muffled sound: unstable pitch and dull audio for a true tape feel.
Three prompt models:
Clean retro VHS
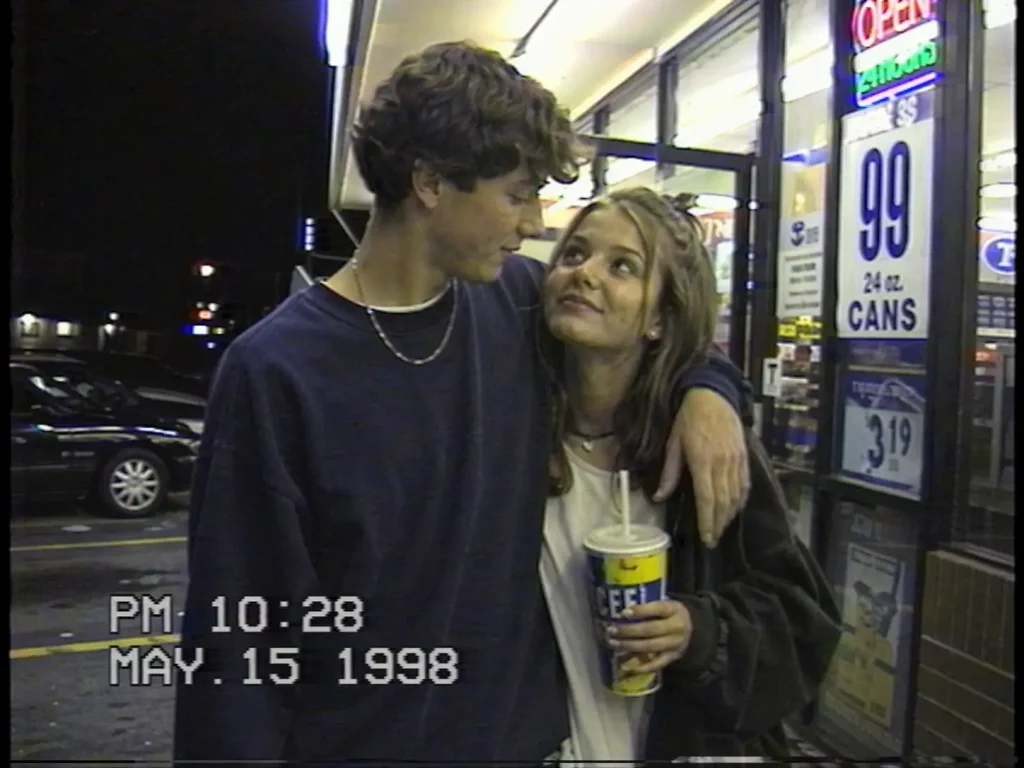
Teenage couple outside a convenience store at night, late 1990s, handheld camcorder, 4:3 aspect ratio, soft channel blur, mild color bleed, light luminance noise, slight camera shake, date stamp, nostalgic home-video mood.
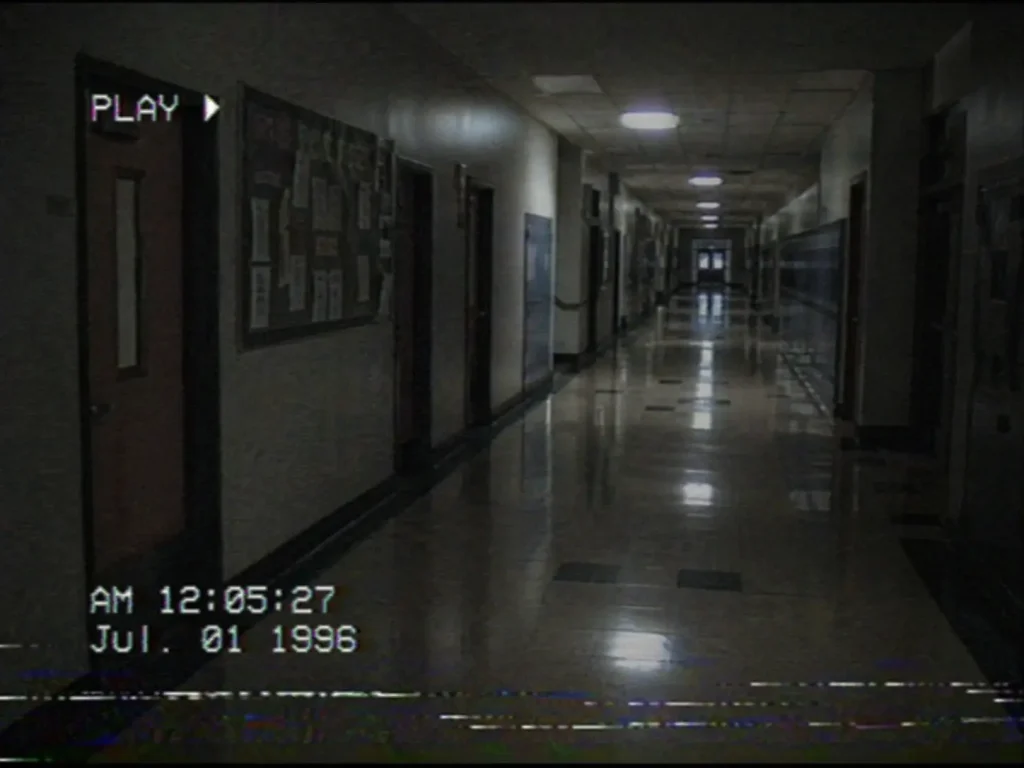
Analog horror VHS
Empty school hallway after dark, old camcorder recording, 4:3 frame, underexposed fluorescent lighting, tracking error, head switching noise, loss of color lock, low-light grain, muffled audio, eerie found-footage realism.
Dreamcore VHS
Empty playroom at sunset, early 2000s home video, faded pastel palette, soft blur, tape wobble, slight skew error, weak chroma separation, faint timestamp, hazy half-remembered dream mood.

If your model supports negative prompts, exclude: ultra sharp, cinematic bokeh, HDR, glossy skin, perfect stabilization, DSLR look. Those cues fight the analog language above.
A simple VHS workflow for AI Image to Video
If this article is living on an AI video generation site, the workflow should not end in Premiere. It should begin with AI.
Start by choosing your VHS subtype: clean home video, damaged tape, camcorder documentary, surveillance, dreamcore, or retro promo. If you skip this step, your prompt will stay generic.
Then generate short clips inside AI Image to Video with the VHS-friendly language already baked in. Do not try to force every artifact at once. Start with the right scene, framing, and camera feel first.
Next, review the raw output and ask a simple question: does it already feel like old footage, or does it still feel like modern AI footage wearing a costume? If it feels too clean, generate again with more specific behavior cues such as handheld home video, soft tape texture, slight tracking wobble, date stamp, consumer camcorder auto exposure.
After that, decide how far you want to go in post. For many short-form videos, the AI output plus light finishing is enough. For more serious analog horror or archive simulation, you can pass the clip through a stronger tool such as ntsc-rs or add a few targeted overlays. That hybrid approach is often smarter than trying to solve everything either with AI alone or post alone.
Finally, do not forget sound. A VHS-looking image with perfectly clean digital audio still feels wrong. Even light hiss, muffled high end, room hum, and uneven mic texture can make the illusion much stronger. Analog horror in particular depends on both visual and audio degradation, not visuals alone.
Final thoughts
The old way to build a VHS video effect was to start with editing software and fight your way toward retro. The better modern workflow is to start with the right AI-generated footage, then add only the amount of analog treatment the concept actually needs.
That is the real opportunity for AI Image to Video. It is not just a faster way to make clips. It is a faster way to create footage that already belongs to a VHS world: dreamcore, horror, nostalgic memory edits, faux documentaries, retro promos, and all the strange in-between aesthetics that do not look right when they are too clean.