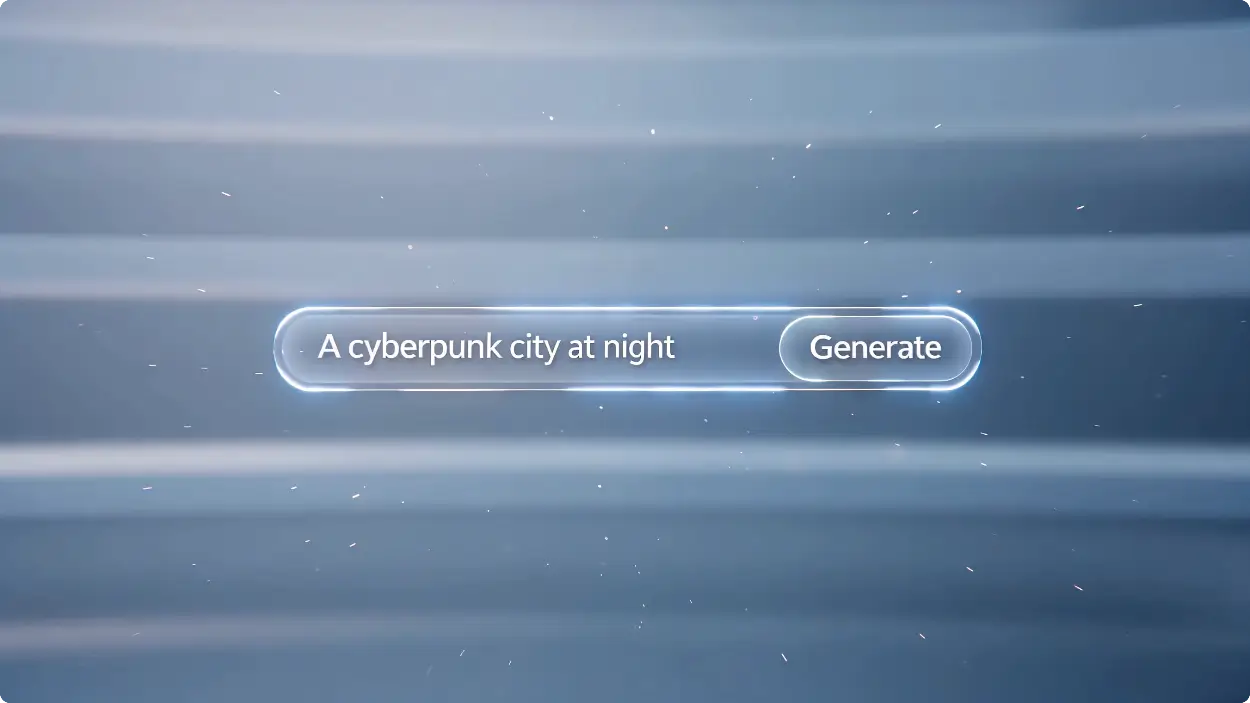
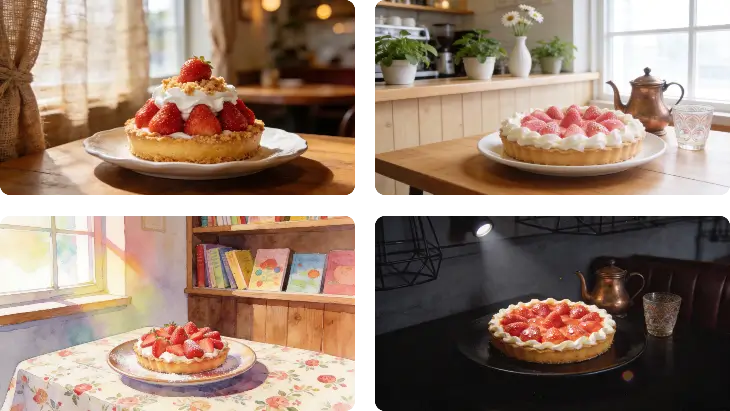
Flux、GPT Images2、NanoBanana、制限なし、ログインなしで無制限の AI 画像ジェネレーターを使用して画像を作成
無制限の AI 画像ジェネレーターはサインアップを必要とせず、クリエイター、マーケティング担当者、愛好家にとって最適なツールです。ソーシャル メディア用の AI 画像アセットを生成する必要がある場合でも、ユニークなアートワークをデザインする必要がある場合でも、このプラットフォームを使用すると、想像力を瞬時に無制限に実現できます。
無制限の AI 画像ジェネレーターはサインアップを必要とせず、クリエイター、マーケティング担当者、愛好家にとって最適なツールです。ソーシャル メディア用の AI 画像アセットを生成する必要がある場合でも、ユニークなアートワークをデザインする必要がある場合でも、このプラットフォームを使用すると、想像力を瞬時に無制限に実現できます。
ローカル AI 画像ジェネレーターや複雑なセットアップを必要とするツールとは異なり、当社のプラットフォームはシームレスな AI テキストから画像へのジェネレーター機能を提供します。毎日無料のクレジットを利用し、高度な AI 画像生成モデルにアクセスし、技術的なハードルなしにリアルな AI 画像から様式化されたアートまであらゆるものを作成できます。
制限なく AI 画像を生成する必要がある場合、当社のプラットフォームは際立っています。制限のない AI 画像ジェネレーターとして機能し、クリエイティブな境界を探索できます。 Perchance AI 画像ジェネレーターや Midjourney と比較する場合でも、当社の AI 生成画像ツールは、面白い AI 生成画像やプロフェッショナルなビジュアルを作成するための比類のない自由度を提供することがわかります。
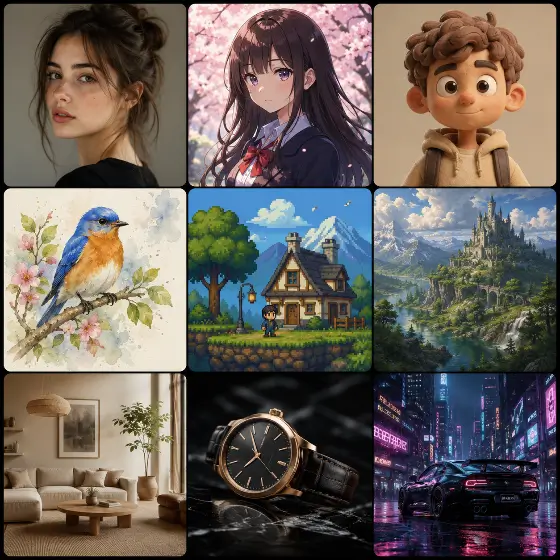
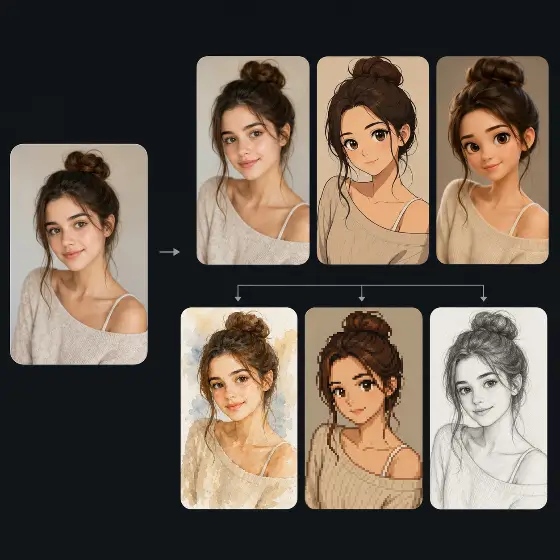
当社の AI 画像生成サービスは、高精細でリアルな AI 画像と鮮やかなアニメ画像スタイルの両方を生成することに優れています。 Bing AI 画像ジェネレーターとは異なり、当社の特殊な AI 画像生成モデルを使用すると、フォトリアリズムとイラストレーションをシームレスに切り替えることができ、クリエイティブ プロジェクトに必要な正確な美しさを確実に得ることができます。
最先端の AI テキストから画像へのジェネレーターとして、当社はプロンプトを素晴らしいビジュアルに変換します。一部のユーザーは基本的なタスクを ChatGPT または Leonardo AI 画像ジェネレーターに依存していますが、当社のエンジンは視覚的な忠実度を重視して最適化されています。照明、構成、スタイルを正確に制御する必要がある場合の画像生成に最適な AI です。
まず、AI テキスト/画像生成インターフェイスに詳細な説明を入力します。あるいは、AI 画像生成機能を使用して参照写真をアップロードし、クリエイティブなビジョンで AI をガイドします。
アスペクト比を調整し、好みのアート スタイルを選択し、創造性の強さを微調整します。これらのコントロールにより、AI 画像生成モデルがポートレートであろうと広い風景であろうと、ユーザーが思い描いたものを正確に生成できるようになります。
生成ボタンをクリックすると、AI が数秒で画像結果を生成するのを確認します。満足したら、高解像度ファイルをデバイスに直接ダウンロードするだけで、個人または商業プロジェクトですぐに使用できるようになります。
当社の画像生成用 AI は、多様なクリエイティブ ニーズに十分に対応できる多用途性を備えています。マーケティング アセットのデザインから個人のアバターの作成まで、最高の AI 画像ジェネレーターにより、ユーザーは高度なグラフィック デザイン スキルや高価なソフトウェア サブスクリプションを必要とせずに、高品質のビジュアルを作成できます。
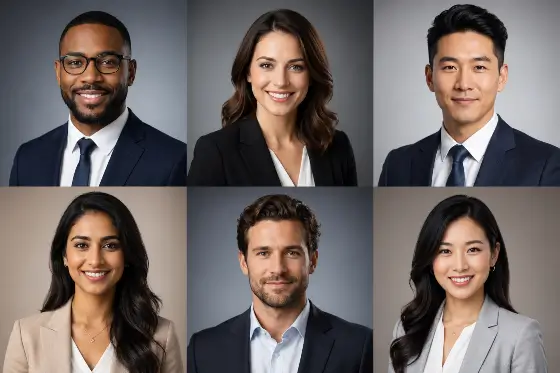
AI LinkedIn 写真ジェネレーターを使用して、プロフェッショナルとしての存在感をアップグレードしましょう。高価なスタジオ セッションを予約する代わりに、写真から AI アバターを生成する機能を使用して、洗練されたビジネス写真を作成します。カジュアルな自撮り写真をアップロードするだけで、AI が完璧な照明と職業的な背景を備えた企業向けの顔写真に変換し、履歴書やネットワーキング プロフィールに最適です。
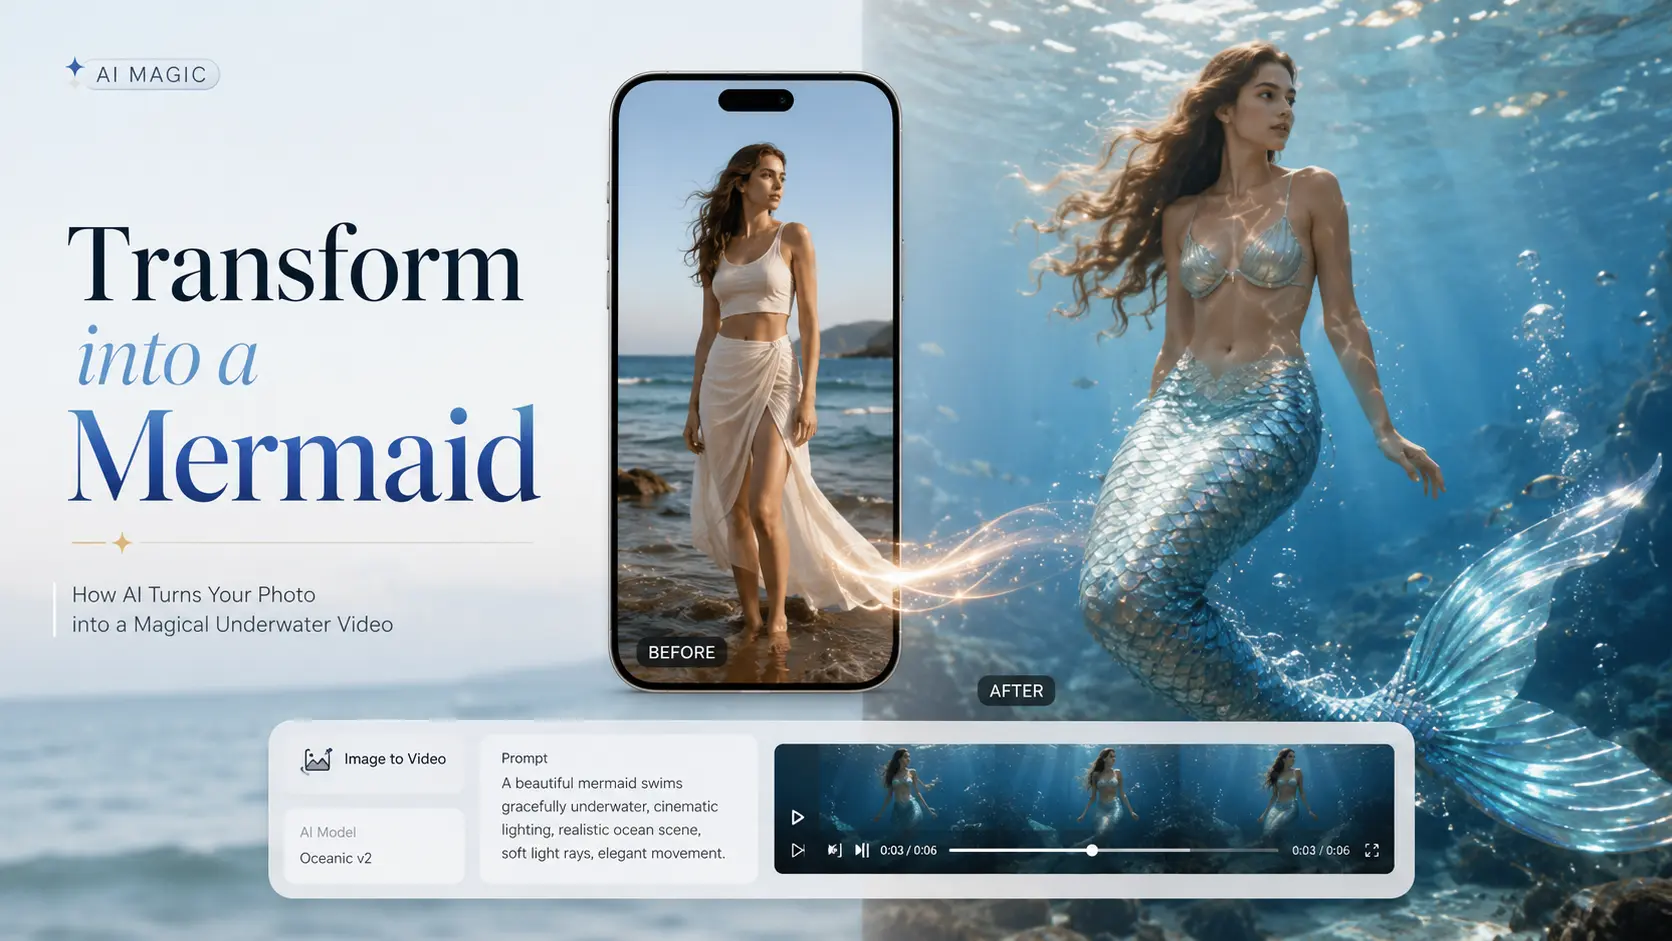
You’ve seen the clip a hundred times: someone’s legs shimmer, scales ripple down, and suddenly there’s a tail. It’s the single most replayed moment in every mermaid video — and now you can apply that exact transformation to your own photo. The problem is that most “make me a mermaid” edits just paste a tail on. They miss the magic, which is the transformation itself — skin becoming fin, that believable blend line. Swimmable tails cost hundreds, photo-edit requests are hit or miss, and generic filters look fake. このガイドでそれが修正されます。 You’ll learn how to turn any photo into a mermaid image and a short transformation video using AI — with the exact steps, copy-paste prompts, and the small tweaks that separate a convincing morph from an obvious paste-on. No tail, no pool, no folklore. Just your selfie and a few minutes. What You Can Make With an AI Mermaid Transformation Before you start, it helps to know what’s actually on the table. An AI mermaid transformation turns a normal photo into mermaid content in two formats, and the format you choose shapes everything else. Mermaid photos vs. mermaid videos (and which to pick) A still mermaid portrait is a single image: you in a tail, underwater light on your face, scales catching the glow. It’s perfect for profile pictures, fantasy portraits, and cosplay reference shots. A mermaid video is a short image-to-video clip — the leg-to-tail reveal that performs so well on short-form feeds. If you want the “watch this!” moment, go video. If you want one striking image to post or print, go photo. Quick rule of thumb: Where people use them (TikTok, Instagram, cosplay, profile pics) The same source selfie can power all of these. People most often use AI mermaid transformations for: If you see yourself in any of those, you’re in the right place. Let’s make one. How to Turn Your Photo Into a Mermaid With AI (Step by Step) Here’s the short version: upload a clear photo, choose a mermaid style, write a prompt that describes the leg-to-tail blend, generate, then refine the transition. それでは詳細です。 Step 1 — Pick the right photo Your result is only as good as your source image. Aim for a full-body or waist-up shot with good, even lighting and a simple background. Make sure your legs are visible — that’s where the tail transition happens. Avoid busy backgrounds, harsh shadows, and group photos. One clear subject gives the AI room to build a believable tail. Step 2 — Choose a tool and a mermaid style Pick your AI tool and a mermaid style or preset — tail material, color, and overall vibe (soft, dark, classic, sparkle). Load your photo. One thing to decide now: some tools make still images and some do image-to-video. If you want the moving reveal, choose a tool that supports image-to-video so you don’t have to start over later. Step 3 — Write your prompt and generate In the prompt box, describe the transformation, not just “a mermaid.” Mention the tail, the scales, underwater lighting, and the blend from legs to tail. The more you guide that transition zone, the more convincing the result. (Ready-made prompts are in the next section.) Step 4 — Refine the transition and export This is where believable results are won. Adjust the half-leg, half-tail blend line, regenerate a few variations, and pick the cleanest one. Upscale for sharpness, then export at the right size for your platform — vertical for TikTok and Reels, square for profile pics. Key Takeaway: A great AI mermaid isn’t a tail pasted on — it’s a smooth transition from skin to scales. Spend your effort on the blend line. Best AI Mermaid Prompts and Style Ideas Good prompts are the difference between repeatable magic and random guesses. Use the formula below, then grab a ready-made style. A simple prompt formula that works Build every prompt from the same reusable template: [subject] + [tail style & color] + [scales/skin detail] + [underwater lighting] + [background] + [mood] Worked example you can copy and tweak: “A young woman transforming into a mermaid, iridescent teal tail, fine scales blending up from her hips, soft caustic underwater light, deep blue ocean background, dreamy and magical mood.” Swap the color, scale detail, or mood and you have a brand-new look in seconds. Popular styles with copy-paste prompts (soft, dark, classic, sparkle) Use “inspired-by” wording rather than naming copyrighted characters. Copy, paste, adjust: How to Make an AI Mermaid Transformation Video (Image-to-Video) A still is great, but the moving mermaid transformation video is what gets replayed and shared. This is also the easiest way to capture that leg-to-tail reveal in motion. From mermaid photo to a moving reveal Take your generated mermaid image (or even your original photo) into an image-to-video tool. Choose a transformation or transition motion, set a short length, and generate the morph. Platforms like AI Image to Video are built for exactly this — turning a single image into a watermark-free vertical clip optimized for TikTok and Reels, with control over duration and motion intensity. That makes the leg-to-tail reveal quick to produce and ready to post. Transition tips for a smooth, satisfying morph A few habits make the morph look intentional instead of glitchy: Common Mistakes and Quick Fixes for Realistic Results Most fake-looking results come from the same handful of issues. Here’s how to fix each fast — plus quick answers to the questions everyone asks. Mistakes that make it look fake (and how to fix each) Quick answers (is it free, is it safe, what photo works best) Ready to see yourself transform? Grab a clear photo, pick a style and prompt above, and turn it into a mermaid image — then bring it to life as a short reveal with an AI image-to-video tool like AI Image to Video. Your transformation is just a few minutes away.
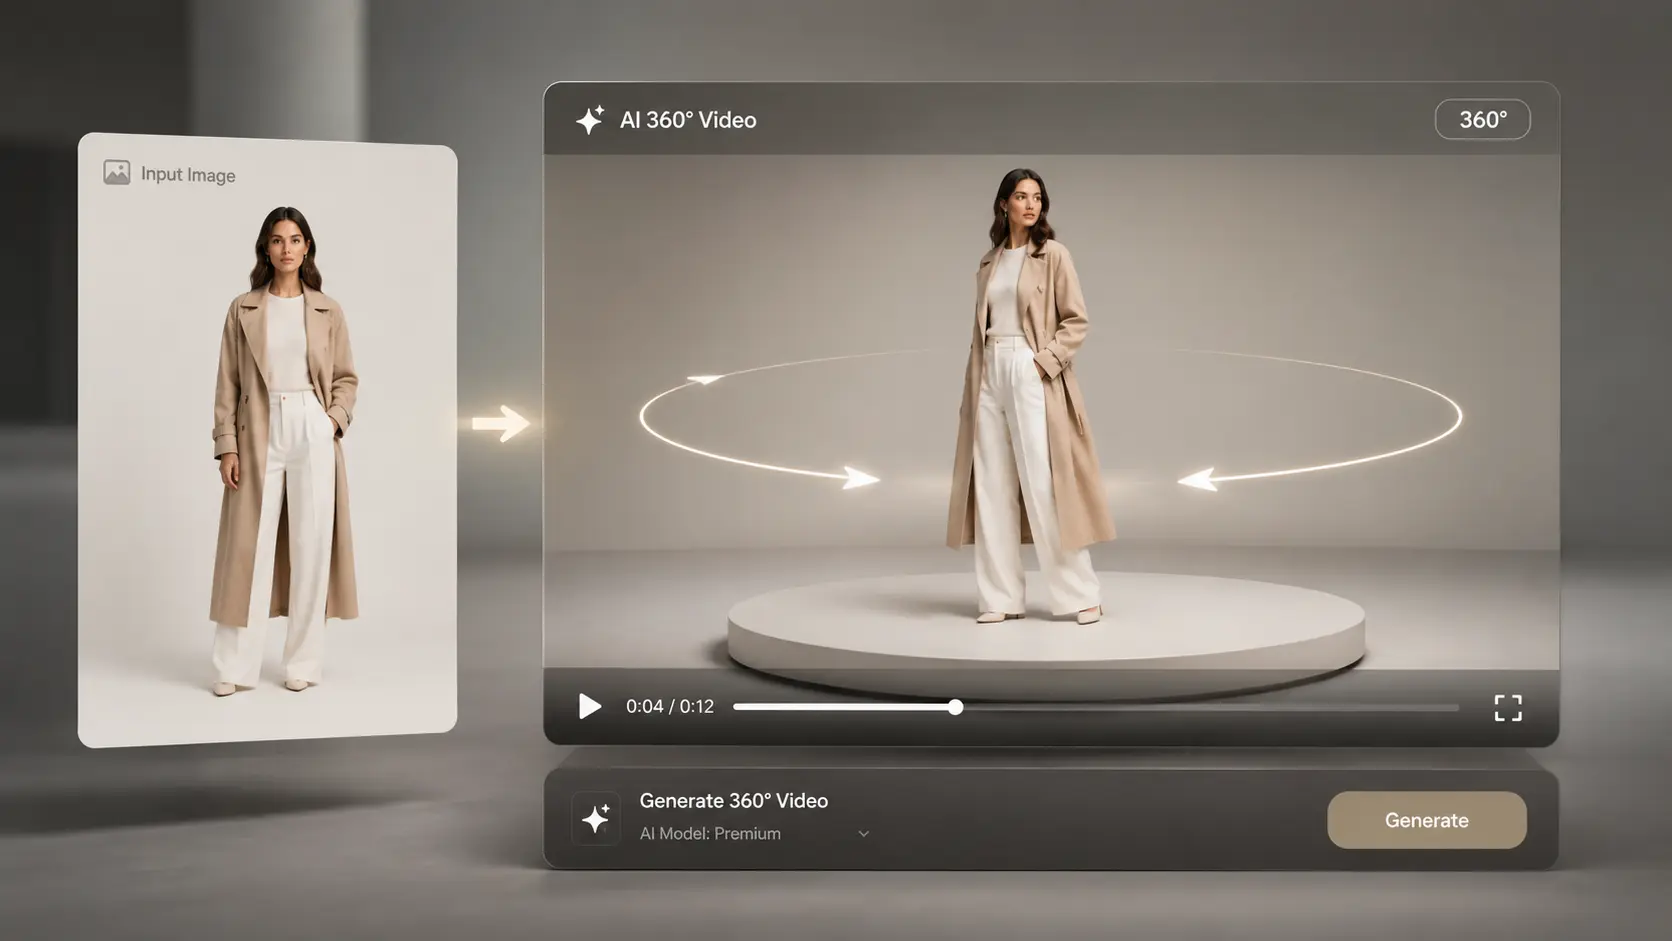
You can turn a single photo — a product, a person, a car, or a model — into a smooth 360° video with AI, with no camera, studio, or editing software. The hard part is that most first tries go sideways: you get a “wobbly photo,” a warped product, a subject that spins about 30° and stops, or a face that melts at the edges. Almost always, that comes down to picking the wrong method or writing a vague prompt. このガイドでそれが修正されます。 You’ll learn what an AI 360° video actually is, the exact steps to make one, copy-paste prompts you can drop your own subject into, the subjects that work best, and quick fixes for the errors everyone hits. AI 360°動画とは何ですか? An AI 360° video is a short video where the subject makes a full turn, or the camera smoothly moves around the subject. It can be generated from a single photo, a product image, or a text prompt. There are two common styles. A spin video means the subject rotates in place while the camera stays still. A camera orbit video means the subject stays still while the camera circles around it. For best results, make the movement clear in your prompt. Use “the subject rotates 360 degrees” for a spin effect, or “the camera orbits around the subject” for an orbit effect. How to Make a 360° Video with AI: Step by Step Five short steps take you from a photo to a finished clip: (1) prepare a clear image or prompt, (2) choose an AI image-to-video tool, (3) write a 360° prompt and set the motion direction, (4) generate, then (5) review and optimize until the turn is smooth. 以下に、実際の4つのステップに分けて、全体のワークフローを示します。 Step 1 — Prepare your image or text prompt Start with one clear, well-lit photo. The subject should be centered, fully visible, and shot against a clean, simple background — that gives the AI the best chance of keeping it stable through a full turn. If you’re starting from text instead, write a specific description of the subject rather than a vague one. Step 2 — Choose an AI image-to-video tool Look for a tool that supports both image-to-video and text-to-video, gives you control over motion intensity and aspect ratio, and exports clean, high-resolution clips. AI Image to Video is a solid fit here — it converts images or text into video using top models like Kling, Veo, and Wan, outputs up to 4K with no watermark, and lets you dial in motion intensity and video length. That motion control matters a lot for a clean 360° turn. Step 3 — Write your prompt (and set the motion direction) Name the subject, then say what you want: “the camera orbits 360 degrees” or “the subject rotates a full 360°.” Set the direction (clockwise, or left-to-right), and ask for slow, smooth, steady motion with the subject staying centered and still. You’ll find ready-made templates in the next section. Step 4 — Generate, review, and optimize After generating, check three things: the rotation completes a full circle, the subject stays stable, and the background doesn’t drift or duplicate. If something’s off, lower the motion speed, simplify the prompt, or regenerate. Nudging the duration or motion intensity often turns a half-turn into a complete, smooth one. Copy-and-Paste 360° Video Prompt Templates The fastest way to get a good result is to start from a prompt that already works, then swap in your subject. Copy any of these and replace the text in [brackets]. Product spin prompt (e-commerce): Product spin prompt (e-commerce) Use for: a 360-degree product video for a store page. Camera-orbit prompt (people, cars, architecture) Use for: a true camera orbit, not a flat spin. Turntable prompt (characters, clothing, toy models) Use for: image-to-360 video of people, outfits, and models. AIを活用した360度動画に最適な被写体は何ですか? AI 360° videos work best on clear, simple subjects: products, cars, clothing, toy models, characters, people, and buildings. Solid backgrounds and visible, well-lit subjects rotate the most smoothly. Some subjects rotate cleanly almost every time; others need extra care. Picking the right one saves you a lot of regenerating. Great subjects: products, cars, clothing, and toy models These have defined shapes, simple surfaces, and clear edges, which lets the AI keep them stable through a full turn. They’re ideal for store pages and short social clips, and they tend to look polished on the first or second try. Trickier subjects: people, characters, and detailed/architecture shots Be realistic here. Faces, fine details (freckles, hair, logos), reflective or transparent objects, and busy backgrounds can warp or drift as the AI invents the unseen side. You can still get good results — just use a clean background and a clear, front-facing photo to give the AI less to guess at. Common 360° Video Problems (and How to Fix Them) Most 360° issues have a one-line fix. The table below covers the five problems people run into most, and each is explained underneath. Problem Quick fix Image distortion or warping Use a sharp photo; simplify the prompt; add “no warping, no distortion” Incomplete rotation State “a full 360°”; raise duration or motion slightly; regenerate Background drift / duplicated scenery Use a plain background; add “consistent background, no new objects” Unstable or shaky subject Lower motion; add “subject stays centered and perfectly still” Camera moving too fast Use “slow, smooth, steady”; reduce motion intensity Image distortion or warping This usually comes from a blurry, low-res source or an over-complicated prompt. Use a sharp, well-lit photo, keep the prompt simple, and add “no warping, no distortion.” Incomplete rotation (only turns partway) If the subject turns part way and stops, the motion is too slow for the clip length or the prompt is vague. State “a full 360°,” bump up the duration or motion a little, and regenerate. Background drift or duplicated scenery When the AI can’t see the far side, it sometimes invents or copies scenery. A plain, solid background fixes most of this — add “consistent background, no new objects” to reinforce it. 不安定な
Creen AIは、Sora 2やVeo 3.1といった有力モデルを含む28種類の動画モデルと11種類の画像モデルを、登録不要の単一のタブにまとめて搭載している。 On paper, that sounds like the best free deal in generative AI. Yet its App Store rating sits at just 3.4 stars, and something about that gap is worth investigating. Here’s the recurring frustration: nearly every “free unlimited AI generator” slams into a paywall the moment you click Generate, and Reddit and YouTube threads are full of people who can’t tell which “free” promise still holds today. So does Creen AI deliver, or is it one more bait-and-switch? この2026年版レビューでは、マーケティングと現実を切り離し、Creen AIが実際に何を提供しているのか、無料枠を超過した場合の費用、信頼性、そして期待に応えられなかった場合にどの代替サービスが有効なのかを検証します。 Creen AIとは何ですか? Creen AI is a browser-based and mobile studio that brings AI image, video, and audio generation together in one interface. The big selling point is low friction: you can start creating without an account, and many outputs arrive without a watermark. Creenは、タスクごとに別々のアプリを使い分けるのではなく、数十もの最先端のモデルを1つのワークスペースにまとめています。これはモデルというより、多くのエンジンへのアクセスを一度に再販するアグリゲーターと言えるでしょう。 Creen AIの背後にいるのは誰? This is where transparency gets murky. The official site (creen.ai) lists CODESAIL LIMITED in Hong Kong. The iOS listing on the Apple App Store names Beijing Fun Fan Technology, while Android credits AIMOBI. 1つの製品に3つの開発者IDが存在することは、必ずしも危険信号ではありませんが、誰がデータや支払いを扱っているのかを確認するのが難しくなります。アップロード処理やサブスクリプション販売を行うツールにとって、この曖昧さは重大な問題となります。 What You Can Create With Creen AI Creen organizes its toolkit around three creative pillars: All three run from the same dashboard, and the web version requires no login to begin. Is Creen AI Free? Pricing, Quotas & Watermarks Explained That summary resolves the doubt most searchers arrive with. Now let’s break down the details. The Free Daily Quota — What You Actually Get The free tier hands you a limited daily allowance across a subset of models. For casual users generating a handful of images or short clips, that’s often enough to finish a small project without spending anything — and without an email signup on the web. The catch is that the most capable models usually sit outside the free pool, and the daily cap quietly resets rather than rolling over. Community testers also report that the free allotment has been shrinking over time. When You Hit the Paywall (Credits & the $20–$30 Subscription) Once you reach for frontier engines like Sora 2 Pro or Veo 3.1, Creen switches to a credit system. Run out of credits, and you’re prompted to buy more or subscribe. Evidence of this tightening is easy to find. A popular YouTube tutorial on Creen’s free video generation drew top comments saying the tool is “no longer free” and now throws up a roughly $20 subscription wall on Generate. The iOS app, meanwhile, offers in-app purchases including a plan near $30/month. Quick Verdict: Free to Start, Not Truly Unlimited Tier Models Resolution Watermark Cost Free daily quota Select image/video engines Up to 4K stills / 1080p video None on select outputs $0 Premium credits Sora 2 Pro, Veo 3.1, etc. Highest available None Credits Mobile subscription Full access Highest available None ~$20–$30/mo The honest takeaway: Creen is genuinely free to try, but “unlimited” is marketing, not reality. Creen AI Features & Supported Models Beyond the pricing question, Creen’s real draw is the sheer breadth of models you can reach in one place — something competing pages rarely lay out clearly. AI Image Generation (Up to 4K, 11 Models) Creen supports both text-to-image and image-to-image at resolutions reaching 4K (3840×2160). It draws on roughly 11 image models, including Seedream 4.5, Z-Image Turbo, Nano Banana Pro, and GPT Image 2. その多様性により、タブを離れることなく、フォトリアル、イラスト風、様式化されたスタイルなど、様々なスタイルを切り替えることができます。 AI Video Generation (28 Models, 1080p, Image-to-Video) Video is the standout. Creen offers text-to-video and image-to-video at 1080p, with clips running up to roughly 10–15 seconds with audio, across about 28 models such as Sora 2 Pro, Veo 3.1, Seedance 2.0, Kling V3, and Hailuo 02. [Image: Creen AI video generation dashboard showing model selection] Editing & Control Tools (Multi-Reference, Negatives, Seed Control) For creators who want more than a one-shot prompt, Creen includes a respectable control layer: Renders are fast too — images in about 5–15 seconds, video in roughly 20–40 — with parallel queues so jobs don’t bottleneck. How to Use Creen AI (Step-by-Step) The workflow is deliberately simple, which is part of the appeal for first-timers. Generate Your First Image in 60 Seconds Turn a Photo Into Video (Image-to-Video) Creen’s image-to-video flow is what most searchers actually want: Is Creen AI Legit & Safe to Use? これは競合他社のレビューでほとんど見落とされている部分ですが、商業調査を依頼する人が費用をかける前に最も必要とする部分です。 The “AI Greem” Naming Confusion If you search Google Play for “Creen AI,” you may land on an app branded “AI Greem” instead. It’s the same product under a different name and developer (AIMOBI), which understandably trips people up. Before installing, confirm the developer and listing details so you don’t grab a copycat app by mistake. App Store Rating & Billing Complaints Creen’s iOS app currently holds a modest 3.4-star rating. More concerning, at least one review describes being charged around $30/month without receiving the promised credits. One billing complaint isn’t proof of a scam, but it’s a reason to read recent reviews and watch your statement before subscribing. Commercial Use & Content Policy Many outputs are usable commercially, which appeals to marketers and e-commerce sellers — but watermark and licensing terms vary by model and tier, so check before publishing client work. Creen also prohibits NSFW content, so it’s
Search for a free AI image or video generator in 2026 and Unlucid AI keeps surfacing. The site reportedly pulls in around 7.8 million visits a month, which is a striking number for a tool most people hadn’t heard of a year ago. That popularity comes with a fog of mixed reviews. Some pages call it a no-catch creative studio; others flag trust warnings and quietly funnel you toward whatever tool they’re selling. So the honest question stands: is Unlucid AI genuinely free, reasonably safe, and actually good — or just another app that paywalls you after two clicks? This review cuts through the hype. We’ll cover what Unlucid AI really is, what it can and can’t do, how its “Gems” pricing works in practice, whether it’s safe to use, and how it stacks up against the bigger names. By the end you’ll know if it fits your work, or if your time and money belong elsewhere. Unlucid AIとは何ですか? Unlucid AI in one paragraph (quick answer) Unlucid AI is a free, browser-based tool for generating and editing images and turning photos into short videos using 15-plus one-click effects. It runs on a “Gems” credit system with free daily gems plus optional paid packs starting at $8.99, and it needs no download and no sign-up to get started. Who Unlucid AI is for The tool clearly targets people who want results without a technical setup. Think social-media creators, hobbyists, students, and digital artists who’d rather type a prompt than wrestle with a local GPU and a stack of model files. If you’ve ever looked at a ComfyUI tutorial and closed the tab, you’re the intended user. Unlucid trades the deep control of a power-user workflow for speed and simplicity. That’s its whole pitch. unlucid.aiとunlucid.info ― どちらが本物の製品なのか? Here’s a source of confusion worth clearing up early. The main product lives at unlucid.ai and runs on the Gems credit model described throughout this review. A second landing page, unlucid.info, advertises “completely free, unlimited, no credit card” access. Those two claims don’t match. Treat unlucid.ai as the real, actively maintained product, and read any “unlimited and free forever” messaging with healthy skepticism — credit-based tools rarely give away unlimited video rendering. What Can Unlucid AI Do? (Key Features) Feature lists for this tool vary wildly across the web, partly because many reviews are stale or spun by AI. The capabilities below reflect what the official site and tutorials actually describe. AI Image Generation The image generator offers five visual styles: Realistic, Pencil, Cartoon, Anime, and 3D. You get the controls you’d expect from a modern generator, including seed values for reproducibility, a reference-image option, and HD upscaling for sharper output. It’s not aiming to dethrone Midjourney on artistry. The goal is fast, decent-looking images from a plain text prompt, with enough knobs to nudge the result without overwhelming a beginner. AI Image Editing Editing is arguably the more practical side of the tool. You can remove, add, or replace objects, swap or blur a background, retouch portraits, and apply style transfer, using either an automatic mask or a manual brush to mark the area you want changed. This is where a lot of legitimate, everyday use happens. Cleaning up a stray object in a photo or changing a dull background is the kind of task that used to mean opening Photoshop. Image-to-Video & Effects AI The headline feature is animation. Feed it a still image, pick a preset, and Unlucid turns it into a short clip. The effects library includes named presets like Dance, Squish, Smash, Crush, 360° spin, Flying, and Zoom, alongside text-to-video and a Prompt Enhancer that pads out short prompts. Finished clips export as MP4. The trade-off is length. These are short animations, not minute-long scenes, so set expectations accordingly. The “uncensored” / no-restrictions positioning — and its limits Much of Unlucid’s buzz rides on an “uncensored” label, and it’s the thing most reviews fixate on. In practice that means looser content filtering than mainstream tools like ChatGPT or Gemini, not a complete absence of rules. Worth stating plainly: looser moderation doesn’t suspend the law. Creating images of real people without consent carries serious legal and ethical risk, regardless of what a tool technically permits. Treat the “no restrictions” claim as a marketing flag, not a license. How to Use Unlucid AI (Step-by-Step) The workflows are short by design. Here’s how the three most common tasks go, plus how to keep your gem balance topped up. How to generate an image from text Open the image generator, type a description of what you want, and choose one of the five styles. Adjust the seed or add a reference image if you have a specific look in mind, then run the generation and download the result when it appears. How to edit or retouch a photo Upload your photo and pick an editing action, such as object removal or a background change. Mark the area with the auto-mask or brush, describe the change, and apply it. A few seconds later you can review the edit and save the version you like. How to animate a photo into a short video Head to the video or effects section and upload a starting image. Choose an effect like Dance or 360° spin, or write a short motion prompt, then generate. When the clip is ready, export it as an MP4. How to earn free daily gems You don’t have to pay to keep experimenting. New accounts receive a starter gem balance, daily check-ins add a few more, and referrals hand out extra credits. Stacking these is the realistic way to test the tool before deciding whether a paid pack is worth it. Is Unlucid AI Free? Pricing & the Gems Credit System Yes and no — and the “no” part is where most complaints come from. How the Gems credit system works (and burn rate) Every generation spends Gems, the in-app currency. Images cost roughly
Flashloopは12,000人以上のユーザーから4.7つ星の評価を得ているが、あるレビューアーはわずか4日間でクレジットの75%を使い果たしたと主張している。 では、どちらの説が正しいのでしょうか? そのギャップこそが、このアプリを使いこなすのが非常に難しい理由なのです。 「flashloop」で検索すると、紹介コードを宣伝するアフィリエイトリンク、怒りに満ちたYouTubeの暴露動画がいくつか、そして誰かがすでに削除したRedditのレビュースレッドが見つかるでしょう。 誰もあなたが本当に知りたい部分、つまり費用、クレジットの消費速度、そしてその成果が支払う価値があるかどうかといった情報を公開しない。 このレビューでは、そうした問題点を解消します。実際の料金体系、競合他社が曖昧にしているクレジット計算方法、繰り返し出てくる不満点、そして契約前に検討する価値のある代替案などについて解説します。 Flashloopとは何か、そしてどのように動作するのか? Flashloopは、Veo 3、Kling、Sora 2などの高性能モデルを使用して、テキストプロンプトや静止画像を短い動画クリップに変換するモバイルAIビデオジェネレーターです。 また、AI画像も生成します。 売り文句はシンプルだ。スタジオクオリティの動画をスマートフォンで撮影でき、編集スキルは不要。しかも、5つの別々のログインではなく、1つのサブスクリプションで複数のトップモデルを利用できる。 実際には、モデルを選択し、希望する内容を説明する(または開始フレームとして写真をアップロードする)だけで、レンダリングが行われます。 テンプレート化された「アプリ」は、ワンタップでバイラル効果を処理できるため、ほとんどの人が最初にそれを見つけるのはそのためです。 Flashloopは誰が作っているのですか? (開発者と背景)App Storeでは、開発者はモントリオールに拠点を置くBuy Beaver Technologies(15557640 Canada Inc.)と記載されており、最初のリリース日は2025年6月となっています。 第三者アグリゲーターのPollo.aiは、創業者を「La Viral Studio」と称し、20日間で年間経常収益がゼロから1万ドルに達したという驚くべき主張を繰り返している。 その数字はマーケティング目的のものであり、検証済みの統計データではないので、そのように扱ってください。 これは自己申告による数字であり、公式な資料による裏付けがないため、実際の販売実績よりも、ブランドのメッセージングについて多くを物語っていると言えるでしょう。 FlashloopはどのようなAIモデルをサポートしていますか? このアプリの最大の強みは、間違いなくモデルのラインナップだ。 動画用としては、Veo 3(フォトリアルな表現に最適)、Kling 3.0と2.6(ショット間でキャラクターの一貫性を保つことで知られる)、さらにSora 2、Seedance 1.5と2.0、Wan 2.6、Grok Imagineが利用できます。 画像処理には、Nano Banana Proと2、FLUX 2、GPT Image 2が使用されています。 実用的なポイントとしては、リアルな映像を求めるならVeo 3、どのシーンでもキャラクターの見た目を統一する必要があるならKling、そしてスタイリッシュな動きを求めるならSeedanceまたはSoraを選ぶと良いでしょう。 それらすべてが1か所に揃っていることが、本当のセールスポイントです。 テキストからビデオへ vs 画像からビデオへ:実際に何が作れるのか 主な方法は 2 つあります。 テキストから動画を作成する機能は、テキストのプロンプトから直接動画クリップを作成します。一方、画像から動画を作成する機能は、ユーザーが提供した写真をアニメーション化するため、結果をより細かく制御できます。 その上に、あらかじめ用意されたキャラクター、無限ループ機能(Spotify Canvasスタイルの背景に便利)、映像を再スタイリングするためのRecastツール、音楽同期機能、ワンタップでスタイル設定できる機能などが重ねられています。 クリエイターたちは、匿名で運営されているTikTokチャンネルからShopifyストア向けの製品紹介動画まで、あらゆる用途にこれらを利用している。 Flashloopの価格はいくらですか? 価格とクレジットの説明 ここからFlashloopがややこしくなり、ほとんどの解説記事がそこで終わってしまうのです。 料金ページには年間合計金額が表示され、サイト全体に「50%オフ」のバナーが表示されているため、月ごとの金額は手作業で計算する必要がある。 以下は、他の誰も明確に示していない計算式です。 Flashloopのプラン比較(Starter、Creator、Pro、Ultra) プラン 年間価格 ~月額 内容 ビデオモデル? Starter $113.88/年 ~$18.99 約80枚の画像、同時2台 いいえ(画像のみ) Creator $179.88/年 ~$29.99 約120本の動画 + 約160枚の画像、全モデル、同時3台 はい Pro $479.88/年 ~$79.99 約350本の動画 + 約466枚の画像、同時5台、優先キュー はい Ultra $599.88/年 ~$99.99 約500本の動画 + 約666枚の画像、同時8台 はい ほとんどの人が見落としている落とし穴:Starterでは動画は全く作成されません。 AI動画に興味があるなら、月額約30ドルのCreatorプランが最適な入門プランです。 Flashloopクレジットの仕組みはこうです。「ビデオ」を購入するのではなく、クレジットを購入します。各世代の料金は、選択したモデル、長さ、解像度によって変動します。 高解像度の短いVeo 3クリップは、静止画よりもはるかに多くのデータを消費します。 最も重要なルールは2つある。 まず、月々のクレジットはサイクルがリセットされても繰り越されないため、未使用分はそのまま消滅します。 第二に、別途購入する1回限りのチャージパックには有効期限がありません。 動画モデルはクリエイター以上のランクでのみ利用可能です。 動画1本は何クレジット必要ですか? これは他のすべてのFlashloopに関する記事に共通する最大の欠点なので、具体的に説明しましょう。 レビュー担当者が計測したところによると、約1,000クレジットで約8秒の動画が購入できるとのことだ。 あるYouTubeのコメント欄のユーザーは、「動画1本で1000クレジットなんてありえない」と率直に述べている。AI動画は試行錯誤の連続なので、この比率は重要なのだ。 再抽選、プロンプトの微調整、レンダリングの失敗のたびにクレジットが消費され、紙面上では余裕があるように見える計画も、実際に実験を始めるとあっという間に資金が尽きてしまう。 Flashloopは無料ですか? 無料ティアとデイリークレジット:はい、いいえ。 このアプリは無料でダウンロードでき、毎日少量のクレジットが付与されるので、料金を支払わずに試すことができます。 しかし、無料で本格的な量のコンテンツを作成することはできません。 正確な1日あたりの金額はどこにも公表されていないため、それが不満の一因となっている。 最初は数世代分くらいは無料で試せるだろうが、ハマってしまったら有料コンテンツに切り替わるだろう。 Flashloopの無料クレジットを入手して紹介コードを引き換える方法 クレジットが主な障壁となっているため、Flashloopを巡って「1000クレジット無料」動画や紹介コード集といった小規模なビジネスが生まれています。 ある程度は効果がある。 多くの場合そうではないので、狩りに出かける前にその理由を知っておくと良いでしょう。 Flashloopの紹介コードを引き換える方法(ステップバイステップ)重要なポイント:コード入力欄は通常、サインアップ時に表示され、設定画面には表示されません。 そのチャンスを逃すと、ボーナスを失う可能性が高い。 Flashloopコードが機能しない理由 引き換えチュートリアルで「何も得られなかった」というコメントを見たことがあるなら、あなただけではありません。 最も一般的な理由は、あるイライラしたユーザーが発見したように、コードがアカウントごとにではなく、デバイスごとに一度しか機能しないように見えることだ。
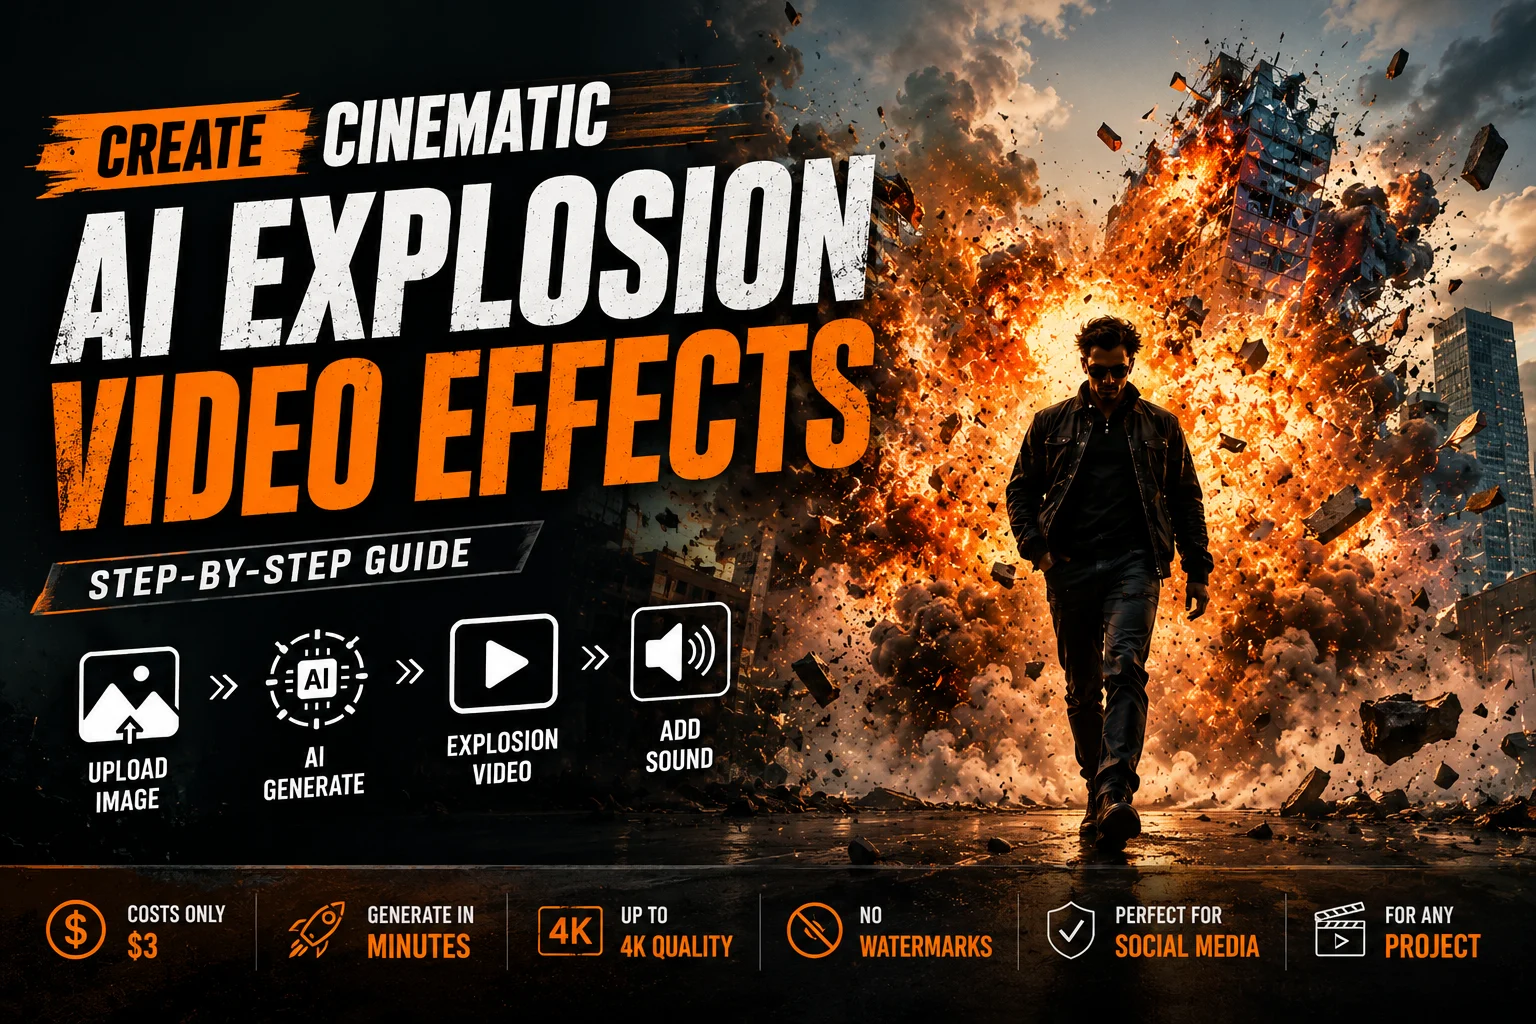
TikTokやReelsに溢れている爆発動画をご覧になったことがあるでしょう。建物が爆発したり、商品が粉々に砕け散ったり、人々が火の玉から逃げ出したりする様子が映っています。 そしてあなたは、クリエイターたちがVFX予算やAfter Effectsの専門知識なしにどうやってそれを実現しているのか不思議に思っているでしょう。 このガイドでは、適切な元画像の選定や効果的なプロンプトの作成から、よくあるリアリズムの問題の修正、サウンドの追加まで、全プロセスを網羅しています。 各セクションには、すぐにコピーして使用できるプロンプトテンプレートが含まれています。 AI爆発動画エフェクトとは何ですか?そして、なぜこれほど普及しているのですか? AIが静止画を爆発動画に変える方法 建物、製品、人物などの写真をアップロードすると、AIモデルがその被写体がリアルな破片、煙、炎とともに爆発する短い動画を生成します。 ほとんどのツールは画像から動画を生成する方式を採用していますが、中にはテキストから動画を作成する方式に対応しているものもあり、その場合はシーンを最初から記述して作成します。 AI Image to Video、Higgsfield、Kaze.aiといったプラットフォームのおかげで、このプロセスは一度のアップロードで済むようになった。 2026年に爆発効果がソーシャルメディアを席巻する理由 AI爆発コンテンツは、「クールな男が立ち去る」ミームや製品発表時の爆発に牽引され、TikTokやInstagramで数十億回の視聴回数を獲得しています。 コスト面でのメリットは絶大だ。AIを使った爆発シーンの制作費は約3ドルだが、カメラ、スタッフ、特殊効果などを含む従来のVFXでは2,000ドルから3,000ドルかかる。 AI爆発ビデオエフェクトを段階的に作成する方法 適切なソース画像またはビデオの選択 入力によって出力が決まります。 被写体が鮮明で、背景とのコントラストが良好な高解像度画像を使用してください。 建物はやや低い角度から撮影するのが最適で、商品は中央に配置し、背景はすっきりとしたものにするべきです。 ぼやけた写真や、ごちゃごちゃした構図は避けましょう。 動画クリップは、カメラの動きを最小限に抑え、5秒以内に収めてください。 ステップバイステップのチュートリアル:最初の爆発エフェクトを生成する AI Image to Videoは、複数のAIモデル(Kling、Veo、Wan)をサポートし、4K出力、ウォーターマークなし、アスペクト比、期間、モーション強度のコントロールを備えているため、出発点として最適です。 爆発効果に試してみる価値のあるその他のAIツール 映画のようなAI爆発を生成するプロンプトの書き方 爆発プロンプトの公式 次の構造を使用します: [主題] + [爆発の種類] + [強度] + [カメラアングル] + [速度] + [照明] + [スタイル]。 「建物が爆発する」といった指示では、単調な結果しか得られない。 それに対して、「10階建てのコンクリート製オフィスビルが1階から巨大な火球に直撃され、破片やガラスがスローモーションで飛び散る。ローアングル撮影、夕暮れ時の光、映画のようなフィルムグレイン。」と表現してみましょう。具体性こそがすべてなのです。 プロンプト修飾子で結果が変わります カテゴリ修飾子 強度 微妙なひび割れ · 中程度の爆発 · 大規模な爆発 · 壊滅的な核規模 速度 リアルタイム · スローモーション · 1000fps 極端なスローモーション · タイムラプス崩壊 カメラ ローアングル · ドローンによる空撮 · 一人称視点 · 360度軌道 スタイル フォトリアリスティック · シネマティック フィルムグレイン · コミックブック インパクト · アニメスタイル 雰囲気 ゴールデンアワー · 炎の光る夜 · 曇り 埃っぽい · 雨と雷 Hailuo 02 は物理用語の処理に最も優れており、Kling はカメラの方向への反応が良く、Seedance は物語のプロンプトに優れています。 すぐに使えるプロンプト テンプレート AI 爆発効果をよりリアルに見せる方法 よくある問題とその解決方法 爆発が「貼り付けた」ように見える場合は、プロンプトに「環境との相互作用、破片が周囲に当たる、表面に塵が積もる」を追加します。 動きが遅すぎる場合は、「リアルタイムの速度」を追加してください。実際の建物規模の爆発は10秒ではなく、1~3秒しか続きません。 変形したり再出現したりするオブジェクトには、短い表示時間とシンプルな構成を使用してください。 生成後の簡単な修正:色、タイミング、構図 CapCut または DaVinci Resolve (無料版) を使用して、周囲の映像の色温度に合わせます。 アーティファクトが集中している最初と最後のフレームをトリミングします。 爆発の瞬間に、わずか2コマ分のカメラの揺れを加えることで、衝撃をよりリアルに表現できます。 爆発音効果を追加して最大のインパクトを与える ほとんどのジェネレーターは無音のビデオを生成します。 レイヤー3の要素:最初の低周波の轟音、二次的な破片音(ガラス、コンクリート)、そして残響を伴う持続的な火のパチパチ音。 無料の音源としては、FilmoraのAIサウンドエフェクトジェネレーター、Freesound.org、CapCutの内蔵ライブラリなどがあります。 AI爆発ビデオエフェクトの最適な使用例 ショートフォームソーシャルメディア:TikTok、Instagram Reels、YouTube Shorts 人気のフォーマットには、クールな男が立ち去るシーン、ビフォーアフターの暴露、コメディ的な爆発の餌などがあります。 TikTokでは、9分16秒の動画を3秒から5秒のタイミングで、流行の音声と組み合わせて使用してください。 CapCutのテンプレートは、モバイルファーストのクリエイターにとって最速の道です。 ゲームのハイライト、ファン編集、クリエイティブプロジェクト。ゲーマーは爆発エフェクトをモンタージュのトランジションとして使用します。 ファンクリエイターたちは、低予算で予告編や短編映画に破壊シーンを追加している。 爆発シーンを別途生成し、CapCutまたはDaVinci Resolveを使用して重ね合わせます。 製品プロモーション、Eコマース、ブランドコンテンツ 製品が爆発的に開封される様子(パッケージが破裂して中身が見える)は、TikTokのEコマースの定番となっている。 効果が発動する前に製品を目に見える状態に保ち、爆発のスタイルをブランドのエネルギーに合わせる。 AI爆発ビデオエフェクトに関するよくある質問 最高の無料AI爆発エフェクトジェネレーターは何ですか? Kaze.aiは、最大8Kの解像度と複数のスタイルを無料で提供しています。 HitPaw Onlineは、ブラウザベースの優れた代替サービスです。 既存の動画にAI爆発エフェクトを追加できますか? Yes. 静止画を抽出し、そこから爆発シーンを生成し、CapCutまたはDaVinci Resolveを使用して元の画像に合成します。 AI爆発動画の生成にはどれくらい時間がかかりますか? ほとんどのツールは1~3分でクリップを作成する。 最終的な仕上げ作業を含めて、合計10分から15分程度を見込んでください。 AIによる爆発動画は、プロの使用に耐えうるほどリアルに見えるのか? ソーシャルメディアに関しては、確かにそうです。プラットフォームの圧縮機能によって、わずかな不具合が隠蔽されるからです。 映画やコマーシャル制作においては、AIが出力した生の映像は、説得力を持たせるためにポストプロダクション処理が必要となる。 AIの爆発動画をソーシャルメディアに投稿するのは倫理的に問題ないのか? エンターテインメント目的のAI爆発は広く受け入れられている。 AIが生成するコンテンツには明確なラベルを付け、実際の緊急事態を模倣することは避け、実際の災害と誤解される可能性のあるコンテンツを作成しないようにしてください。 どのようなアスペクト比と再生時間を使用すればよいですか? TikTok、リール、ショート動画は9時16分から。 YouTubeやウェブサイトは16:9の画面比率で視聴できます。 目に見えるノイズを最小限に抑えるため、爆発の持続時間は3秒から5秒に抑えてください。 結論として、説得力のあるAI爆発動画を作成するには、次の3つの要素が重要です。きれいなソース画像、特定の修飾子を含む構造化されたプロンプト、そして生成後の数分間の仕上げ作業です。 ツールは使いやすく、コストも最小限で、TikTokのミームから製品発表まで、創造的な可能性は無限に広がります。
はい、当社のプラットフォームは、基本的なアクセスに制限のない AI 画像ジェネレーターとして動作します。アカウントを作成しなくてもすぐに作成を開始できます。高度な AI 画像生成モデルのプレミアム レベルを提供していますが、コアの AI 画像生成機能は引き続き完全に無料であり、誰でもアクセスできます。
Midjourney と Nano Banana 2 が人気ですが、私たちのツールはアクセシビリティとスピードに重点を置いています。 Discord のセットアップや複雑なコマンドを必要としない、AI テキストから画像へのジェネレーターを提供します。私たちのインターフェースは、ブラウザーベースで即座に作成できるように設計されており、初心者でも簡単に AI 画像コンテンツを即座に生成できます。
はい、あなたは作成したビジュアルに対する完全な商業的権利を保持します。最新の AI 生成画像の著作権裁定ガイドラインに従って、当社の利用規約は、お客様独自のプロンプトと結果として得られる出力がお客様に帰属することを保証します。マーケティング、商品企画、クライアントプロジェクトなどにご自由にお使いいただけます。
私たちのプラットフォームは、アニメ スタイルに関して画像生成に最適な AI であると広く考えられています。私たちは、アニメの美学を理解するために AI 画像生成モデルを微調整し、専用のアニメ画像ツールに匹敵する鮮やかな色、正確なキャラクターのプロポーション、ダイナミックなポーズを保証しました。
AI 画像ジェネレーターの結果に自分自身を組み込む方法を学ぶには、写真からの AI アバター ジェネレーター機能を使用してください。鮮明な自撮り写真をアップロードし、ブレンドまたは顔の交換オプションを選択すると、AI が生成されたシーンやキャラクター デザインに顔の特徴をシームレスに統合します。
はい、プレミアム プランには、一括 AI 画像生成サービスのための API アクセスが含まれています。これにより、開発者や企業は、AI 画像生成モデルを独自のアプリケーションに直接統合できるようになり、電子商取引カタログや動的コンテンツ生成用の大量の画像作成を自動化できるようになります。
はい、サインアップなしで無料でAIコミック画像ジェネレーターとして当社のプラットフォームをご利用いただけます。コミック スタイルやグラフィック ノベルのパネルなどの特定のプロンプト キーワードを利用することで、最初にアカウントを登録することなく、連続したアートやキャラクター デザインを瞬時に生成できます。


画像生成に最適な AI
Krea AI画像ジェネレーターやGrok AI画像ジェネレーターも試しましたが、まさに画像生成に最適なAIです。無制限の世代とサインアップの煩わしさのなさが、私の毎日のコンセプト アートの原動力となっています。
驚くべき AI によるリアルな画像結果
AIによるリアルな画質は驚くべきものです。製品のモックアップを作成するために使用しましたが、照明は完全に自然に見えます。フォトリアリズムに関しては、AKOOL AI 画像ジェネレーターを簡単に上回ります。
AI 画像生成のトラブルシューティングに最適
迅速なエンジニアリングに苦労していましたが、組み込みの AI 画像生成のトラブルシューティングのヒントが入力内容を改善するのに役立ちました。今ではAIで毎回完璧に画像を生成できるようになりました。
毎日無料クレジットが嬉しい
毎日無料のクレジットを取得できるということは、コストを気にせずに実験できることを意味します。他のプラットフォームとは異なり、この無制限の AI 画像ジェネレーターは実際にその約束を果たします。
ローカル AI 画像ジェネレーターよりも優れています
ローカル AI 画像ジェネレーターのセットアップは、私のハードウェアにとって悪夢でした。このクラウドベースの代替手段は完璧に動作し、GPU を使い果たすことなく、見事な AI キャラクター イメージ デザインを生成します。
完璧なAI画像生成器
AI 画像生成機能は、ラフ スケッチを反復処理するのに最適です。自分の落書きをアップロードすると、AI がそれを洗練されたアートワークに変換します。私のデジタルイラストのワークフローには欠かせないツールです。